Billing Administration
This option provides administrative information about the carriers and the contracts, and rates and billing management tools.
Account Management
This tab is dedicated to classifying administrative information related to the customers, providers, and valid agreements with them.
Figure 42 shows the general structure of this option. The first screen that you will see is a list of contracts with the different carriers.
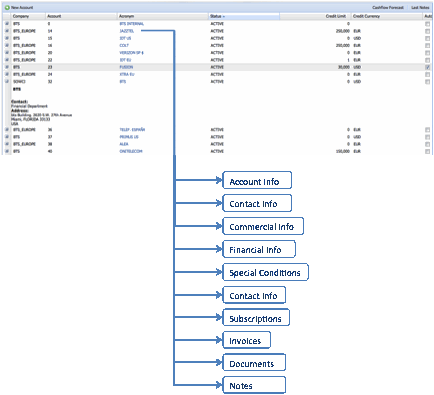
Following is an explanation of the fields of this table.
- Company
This field is useful to manage different companies of the same group that are interconnected with the carriers. You can see a specific company and its accounts by clicking on the right corner arrow of the header and then selecting âFiltersâ. This will display the list of companies that form the business conglomerate. Select the company or companies you want to see the accounts.
- Account
This is the internal Id given to the account.
- Acronym
This is the abbreviated name of the company with whom you have an agreement. You can see a specific account by clicking on the right corner arrow of the header and then selecting âFiltersâ. Type here the name of the carrier you want to find in the list.
- Status
You can select the status of the agreement by clicking on the right corner arrow of the cell and selecting âFiltersâ. You can define the status as âACTIVEâ when the agreement is operational, âBLOCKEDâ when the incoming trunk groups are blocked, and âCANCELLEDâ when the agreement is not valid anymore.
- Credit Limit
This field shows the maximum amount of credit that your company can extend to the carrier. You can use the filter on the header by defining a fixed amount or a range (see figure 43).
- Credit Currency
This is the credit currency that is specified in the agreement.
- Automatic Cut
If the Automatic Cut is activated, the system will block the route once the Credit Limit value is reached. Use the filter to list the accounts with automatic cut or without it.
Now back to figure 42 the button Cash Flow Forecast takes you to a window dedicated to provide information about the expected consolidated incomings and outgoings of cash per account.

This table compiles the cash flow forecast for the following 10 weeks. Make use of the field âFromâ to specify a different time frame you want to see the forecast. The table of figure 44 provides the following information:
- Company
This is the business unit or subsidiary under which manages the account.
- Acronym
This is the abbreviated name of the carrier.
- Period
This refers to the billing period.
- Due Days
The amount of days before the invoice has to be paid.
- Week Number
This refers to the week on which the forecast is being made.
The first line of the table shows the consolidated total forecasted per week. Click on ![]() to see the incomings and outgoings specific account. To see the incomings and outgoings of all the accounts click âExpand Allâ.
to see the incomings and outgoings specific account. To see the incomings and outgoings of all the accounts click âExpand Allâ.
Now, back to the Account Management window (figure 42), the button Last Notes take you to the following window:

This window is useful to compile final notes regarding the performance of the agreement.
Again going back to figure 42, if you expand one of the companies, you will see the general address of the carrier and the financial contact information. If you click on one of the acronyms you will access detail information about the agreement: Account info, contact info, commercial info, financial info, special conditions, contact info, subscriptions, invoices, documents, and notes. Following is an explanation of these windows.
To add a new line in the Account Management table click on âNew Accountâ. The following window will appear:
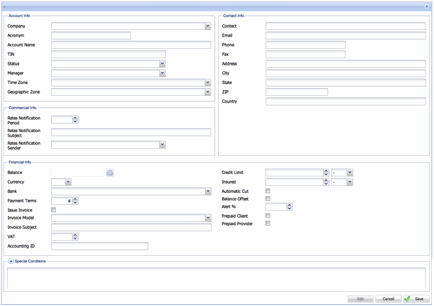
Fill in the information required and save the changes. Following is an explanation of the different tables of this window.
Account Info
In this window you see general information about the account. Figure 47 shows an example for a specific carrier.
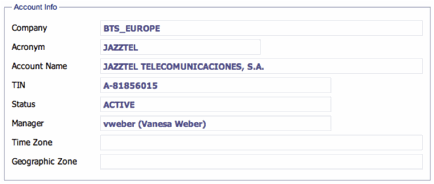
The fields in this window are explained as follows:
- Company
This is the business unit or subsidiary, which manages the account.
- Acronym
This is the abbreviated name of the carrier.
- Account Name
This is the full name of the carrier.
- TIN
This is the Tax Identification Number of the carrier.
- Status
This field denotes whether the agreement is active, blocked or cancelled.
- Manager
This is the person in your company responsible for the relation with the carrier.
- Time Zone
This is the time zone that has been settled in the agreement.
- Geographic Zone
This is useful to define the geographic zone, such as Europe, Latin America, Asia, etc., to which the account belongs.
Note: To enable the edition of most of the fields of Account Info, Contact Info, and Financial info, use the button âEditâ located under the window of Special Conditions. After you make the changes, click âSaveâ to confirm the edition or âCancelâ to discard it.
Contact Info
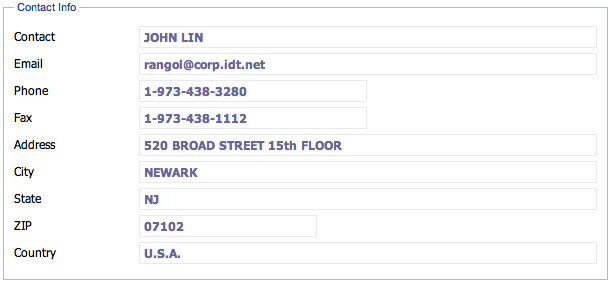
This window gives you specific information about the contact person or department, and the physical location of the carrier. Figure 48 shows an example for a specific carrier.
Commercial Info
This window shows details about the rates notification.

The fields in this window are explained as follows:
- Rates Notification Period
This period is specified in the agreement. It tells the days in advance required to enforce a rate or code change.
- Rates Notification Subject
Some customers accept rate changes through an email automatic upload module. This field specifies the subject of the email you must include to validate the reception of the amendments.
- Rates Notification Sender
This field specifies the email address from which you must send the rate notifications.
Financial Info
This window provides general information about the financial status and the conditions agreed in the contract.

These conditions are:
- Balance
In case of a bilateral agreement, this field shows the difference between the traffic you receive and traffic you send to the carrier in terms of money.
- Currency
The currency is as agreed in the contract.
- Bank
This is the bank where all transactions are made.
- Payment Terms
This is the amount of days that the customer or your company has to pay an invoice.
- Issue Invoice
If this box is checked, it means that a physical invoice should be sent to the customer.
- Invoice Model
This field helps clarify the case where multiple business units emit different invoice models.
- Invoice Subject This field specifies the subject of the email you must include to validate the reception of the invoice.
- VAT
This field indicates the Value Added Tax applied in the invoice.
⢠Accounting ID
This is the ID of the account.
- Credit Limit
A zero in this field means that the customer does not need a credit to send traffic. A one in this field means that the offset value canât be different to zero and further action should be taken. A different amount specified here represents the credit the customer has to send traffic.
- Insured
This is the insurance policy coverage in the event that your company is unable to collect on the accounts receivable.
- Automatic Cut
When this box is checked it means that the routes will be blocked once the credit reaches a zero value.
- Balance Offset
When this box is checked it means that traffic routing is allowed even when the offset value is not zero.
- Alert
The system sends an alert that indicates that the credit limit is reaching this value.
- Prepaid Client/Provider
This field indicates if this is a client or provider prepaid account.
Going back to Balance, Click on ![]() to see the daily movement of consolidated incoming and outgoing invoices, and the balance. The following window will appear:
to see the daily movement of consolidated incoming and outgoing invoices, and the balance. The following window will appear:
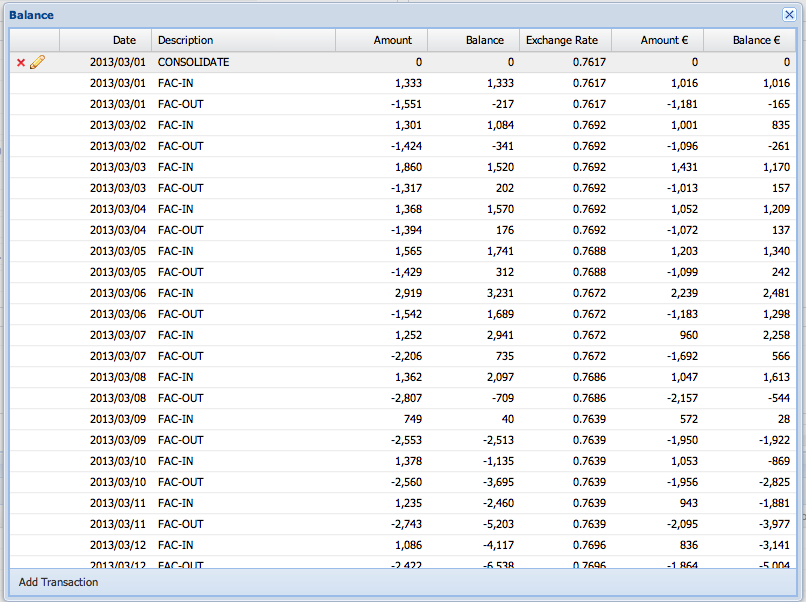
To create a bank transaction click âAdd Transactionâ:

Select the type of operation -Consolidate, Incoming Payment, or Output Payment. Select the date, the amount, the currency, and type a brief description if required. Then click âSaveâ or âCancelâ.
To edit a bank transaction click ![]() and make use of the Operation, Date, Amount , Currency and Description, to make the edition.
and make use of the Operation, Date, Amount , Currency and Description, to make the edition.
Special Conditions
In this field you can document special financial conditions to be considered in the agreement.

Contact Info
This table summarizes the contact information of the different areas involved in the daily performance of the routes of the agreement You can add or delete contacts using the commands âAdd Contactâ, âSaveâ, âCancelâ.

Following is an explanation of this table:
- Delete
To delete a contact, click on the x and then confirm the change by clicking on âSaveâ.
- Name, Email, Phone
These are editable fields that contain detail information of the recipient or contact person.
- Rate, Balance, Automatic Cut, Alert, Invoice
A checkmark on one of these columns indicates that the recipient or contact person is to receive the designated information.
Subscriptions
This table provides information about the existing subscriptions with the carrier. In the example of figure 55 there are two subscriptions with this carrier, one as provider and one as client.

Following is a description of the fields of the table:
- Id
This is the account ID.
- Subscription
This field describes the subscription.
- Type
Here you see the nature of the subscription: Client or Provider.
- Traffic
This field describes the type of traffic thatâs being routed.
- Rate
This identification takes you to the table of applicable rates for the subscription.
- Custom Rating
This field indicates that the rates change according to specific conditions agreed. These conditions could be for example volume of minutes, time of the day when the calls are placed, etc.
- Billing Cycle
These are the billing terms according to the agreement.
Invoices
This table summarizes the recent invoices sent to the customer. The system saves up to two months of invoicing.
⢠Id
XXXX.
⢠Prefix
This field gives an idea of what business unit in your company is invoicing the customer.
⢠Invoice
This is the number of the invoice. The actual file is accessible by clicking on the number.
⢠Invoice Date
This field is the date when the invoice was issued.
⢠Minutes
The volume of traffic billed.
⢠Invoice Amount
This is the amount due by the customer.
⢠Due Date
The last date to submit payment
⢠Accounting Date
Documents
In this field you will find contractual documents or any document supporting the agreement.

Notes
Here you will find information or comments of any nature that help clarify the spirit of the agreement.

Trunk Management
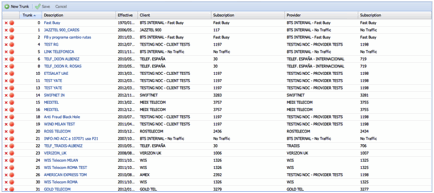
[4/29/13 10:58:05 AM] jorge zeppenfeldt: el base on es la manera en que el billing identificara la llamada, en este caso dice incoming TG / Outgoing trunk, es decir que factura por TG ID [4/29/13 10:58:22 AM] jorge zeppenfeldt: hay otras opciones como DNI Prefix [4/29/13 10:58:55 AM] jorge zeppenfeldt: en esos casos va a una tabla predefinida donde pones prefijos de los DNI a los cuales asignas la subscripcion [4/29/13 10:59:01 AM] jorge zeppenfeldt: por ejemplo [4/29/13 10:59:46 AM] jorge zeppenfeldt: tu puedes poner que para todo lo que venga con el codigo 57 use una subscripcion y si viene con 1 otra y asi ...... [4/29/13 11:00:12 AM] jorge zeppenfeldt: si le dices incoming tg , te pone la subscripcion a todo lo que venga con el TG x [4/29/13 11:00:48 AM] Pilar Saavedra: oook capto. Abajo en esa misma ventana se definen los casos de DNI y ANI [4/29/13 11:01:00 AM] jorge zeppenfeldt: recuedo que tambien habia ANI prefix [4/29/13 11:01:01 AM] jorge zeppenfeldt: si [4/29/13 11:01:27 AM] jorge zeppenfeldt: el ANI prefix es coo DNI prefix pero en base al ANI [4/29/13 11:01:47 AM] jorge zeppenfeldt: eso lo que te dice es como aplicar la subscripcion
Users'
This section explains the user access management to the platform functionalities.

The Users main screen gives you a complete list that you, as an Administrator, will need to manage the profile and permissions of every user. You have access to the following information:
⢠Username
This is user identification accessing the platform.
⢠Group
This field defines the group the username belongs to. The Administrator creates a group based on a role and responsibility matrix of users.
⢠Phone, Cellular Phone Number, Email
This is the contact information of the user.
⢠Op
Click to enable or disable a user.
To add a new user, click on âCreate New Userâ. The following window will open:
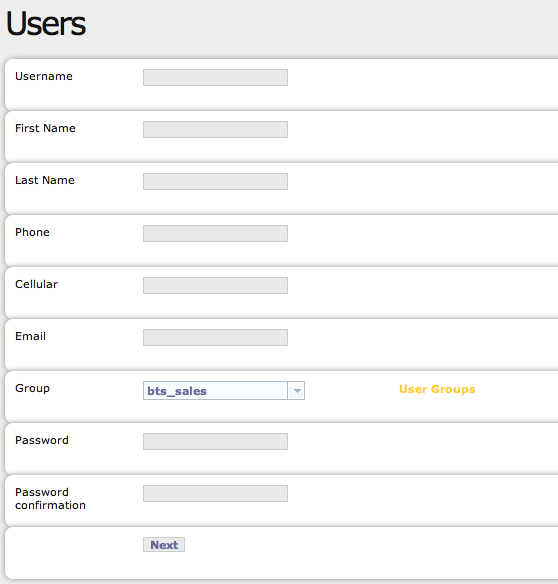
Enter essential data âUsername, First Name, Last Name, Phone, Cellular, Email- and password. Select the Group the user will belong to from a drop-down list.
To access detailed information about the groups that are created in the system, click on User Groups. The following window will open:
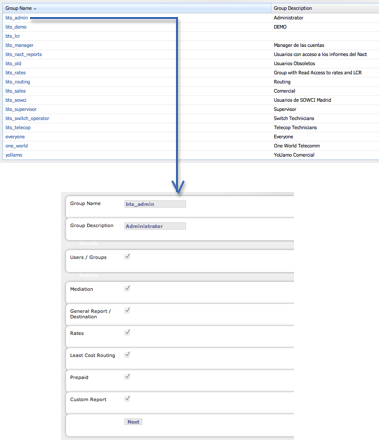
Click on a group to retrieve specific information of it. You can see the following fields:
⢠Group Name. ⢠Group Description ⢠Security - Users Groups ⢠Reports â The access to the different features of the platform is described here. Each group has access to specific options of the menu depending on the user profile and permissions.
Now, if you want to edit data from an existing user, click on the username. The following window will open.
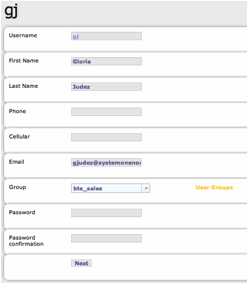
In this window you can:
⢠Edit contact information -Username, First Name, Phone, Cellular, Email. ⢠Edit password. ⢠Edit group - Add or remove the user from a group.