Resource Groups
RESOURCE GROUPS
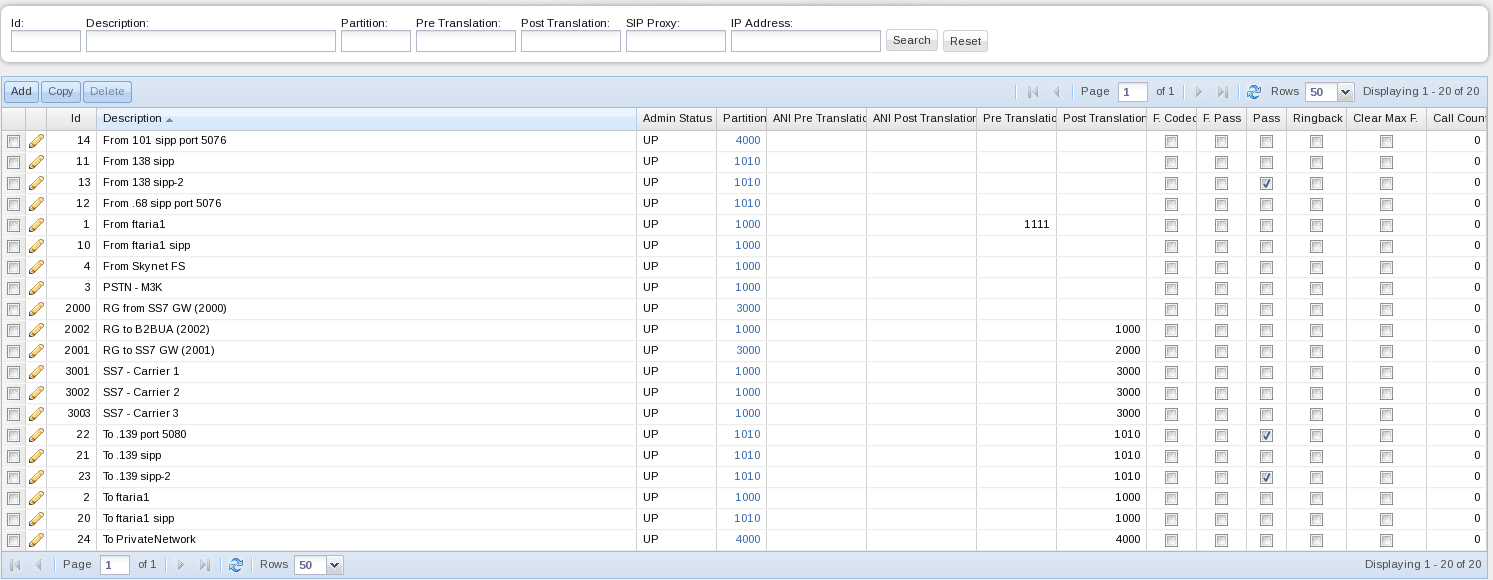
The Resource Group defines the status, direction, translations and other technical parameters needed to identify a carrier in the network. A carrier can have one or more incoming and/or outgoing resource groups. If a carrier is used as for both inbound and outbound traffic, a resource group will need to be defined for each direction.

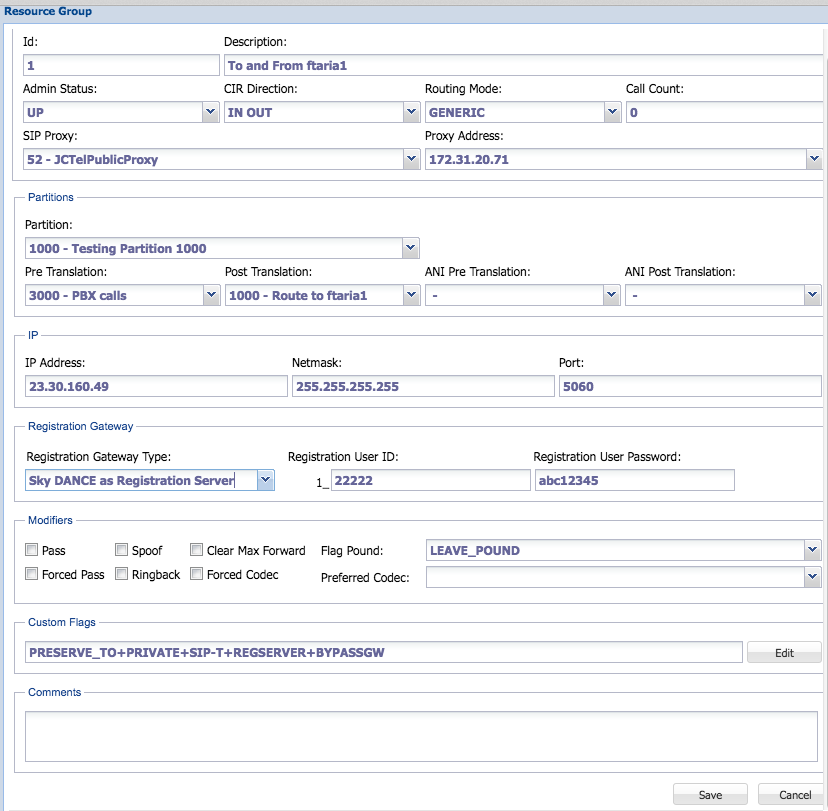
Figure 24 displays the details of a specific RG.

Following is a description of this window:
- General
- Id: This is the number that identifies the carrierâs RG.
- Description: This field describes the Resource Group. It can tell, for example, the carrier that is associated with the RG, the purpose of the RG and the circuit direction.
- Admin Status: This field tells if the RG is active or not.
- CIR Direction: This field tells the circuit direction, IN, OUT, IN + OUT.
- SIP Proxy - For inbound calls this is the proxy instance being used for handling this call
- Proxy Address - This is the listening address that will be used by the SIP Proxy instance for inbound calls.
- Call Count - this is the maximum calls that will be allowed in or out (depending on circuit direction). A â0â call count means unlimited amount of simultaneous calls.
- IP
- IP Address, Netmask, Port.
- For inbound RGs this is the IP address, netmask, and port of the inbound traffic. A â0â in the Port means that you process calls from any port.
- For outbound RGs this should be the Sky Dance proxyâs IP address as setup in the SIP Proxy table.
- IP Address, Netmask, Port.
- Partitions
- Partition: This field defines the Called Translation partition.
- Pre Translation: This field defines the Called Pre Translation table if required.
- ANI Pre Translation: This field defines the Calling Pre Translation table if required.
- Post Translation: This field is mandatory for all outbound resource groups and defines the Called Post Translation table.
- ANI Post Translation: This field defines the Calling Post Translation table if required.
The fields Pre Translation and ANI Pre Translation are used when the RG is used as RG In (client). The fields Post Translation and ANI Post Translation are used when the RG is used as RG Out (provider).
- Modifiers
- Flag Pound: Select one of three options, LEAVE_POUND (the DNI is not modified), ADD_POUND and REM_POUND (remove pound).
- Pass - pass RTP through the SBC
- Spoof - used for far end NAT traversal
- Ringback - provide artificial ringback from the switch
- Clear Max Forward
- Forced Codec - only use the first codec in the preferred codec list
- Preferred Codec - select the codec preferred. Put this at the top of the list.
- Custom Flags - application specific
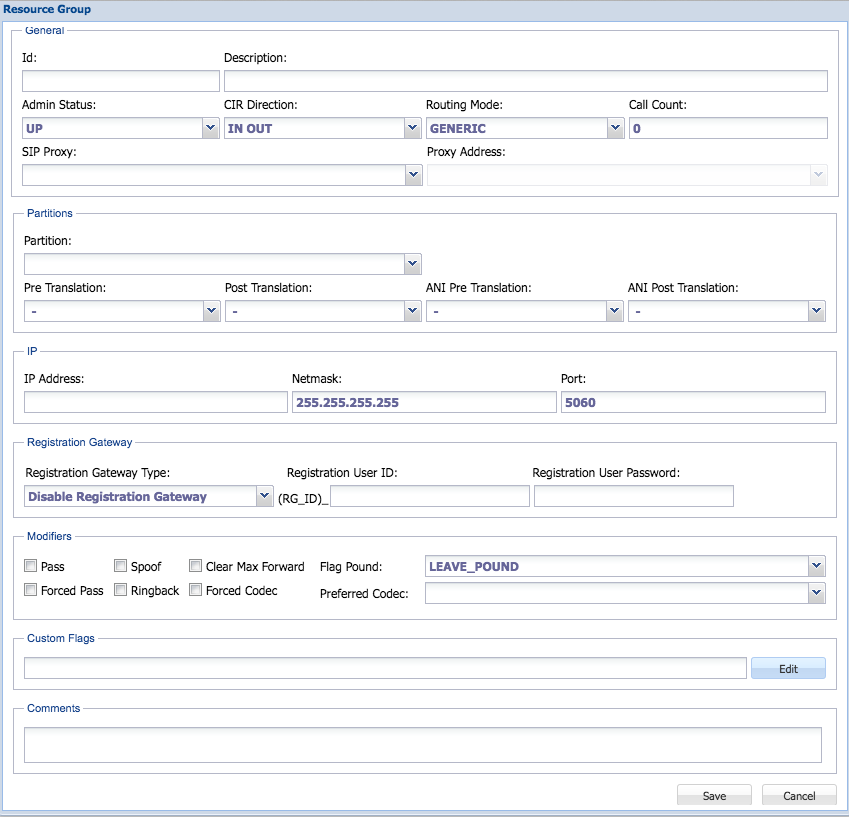
To add a new Resource Group:
- Click âAddâ to create a new Resource Group. The following window will appear:

- Select an available ID. The available IDs will appear as you type one.
- Type the description of the Resource Group if required.
- Select the Administration Status, Circuit Direction and Device Driver.
- Depending on the RG type (client (inbound) or provider (outbound)), enter the Calling Pre Translation and Called Pre Translation, Calling Post Translation table numbers if required.
- Enter the Called Translation table number.
- Enter the Called Post Translation number for RG Out.
- Configure the IP address depending on the type of RG.
- For inbound RGs this is the IP address, netmask, and port of the inbound traffic. A â0â in the Port means that you process calls from any port.
- For outbound RGs this should be the Sky Dance proxyâs IP address as setup in the SIP Proxy table.
- Define the Call Count, the Flag Pound, and the other modifiers.
- Click âSaveâ to confirm the addition or âCancelâ to discard them.
To delete an existing Resource Group select the check box and click âDeleteâ. A confirmation window will appear. Click âYesâ to confirm the deletion or âNoâ to cancel it.
To edit an existing Resource Group select the check box next to the Resource Group you want to edit. The Resource Group window will open for that carrier. Edit and save the changes.