Dial Code
This option in the Main Menu Bar allows you to retrieve data by dial code.
Dial Code -> Incoming Destination
This option shows the traffic data of your customers disaggregated per destination. By default, you will see data for the previous hour.
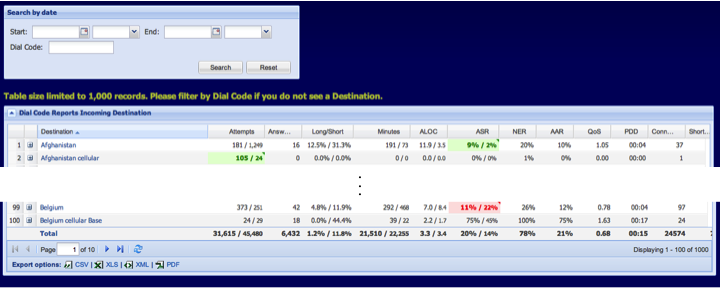
On this screen you will retrieve the first hundred lines of your destinations. In the top section of the window, you can customize this table by date and hour, and/or Dial Code (Figure 20). You can also customize the information in the columns by clicking on the right side of any header cell.
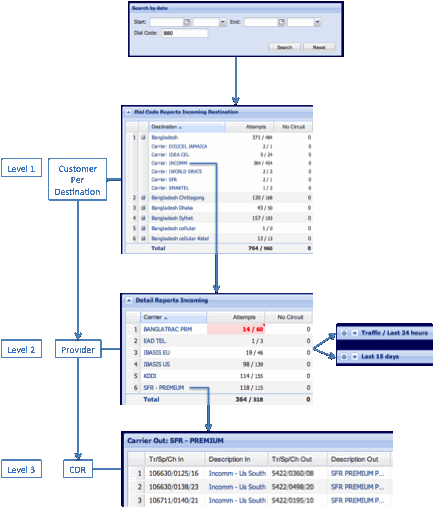
Figure 23 is an example where three customers send traffic to Dial Code 880.
⢠To expand the information of a destination in Level 1, click on .
⢠Now, click on one of the customers to see information of the carriers used to terminate traffic and on which there was at least one call attempt (Level 2).
⢠Level 3 represents the CDR of the route for that specific provider. Back to Level 2, you have the option to load data for the last 24 hours and last 15 days (Figure 24). When you load these tables, you can see the details of the carriers on which there was at least one call attempt in the last 24 hours.
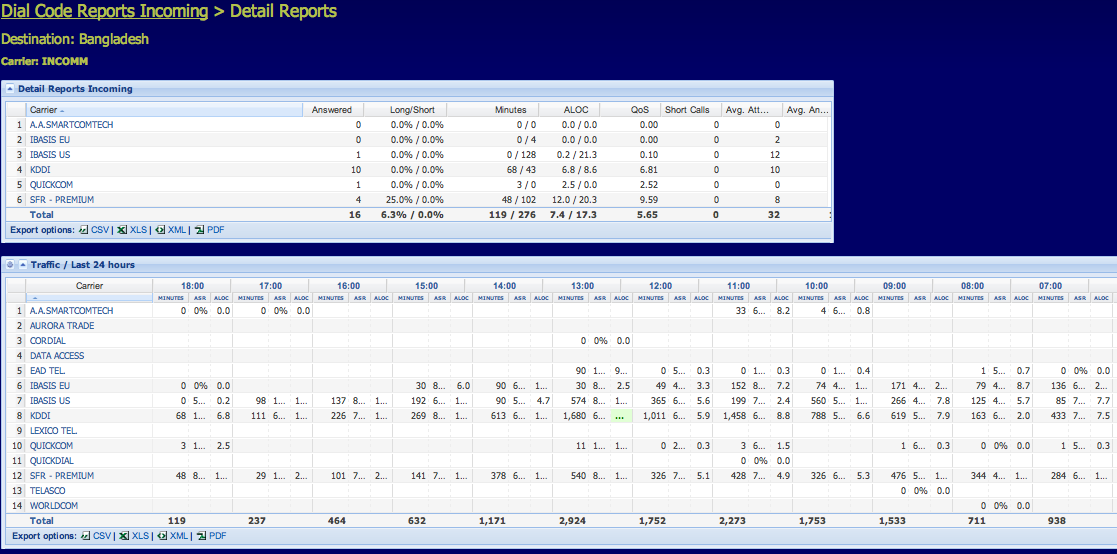
Once in this window you can go to the CDR level by clicking on one carrier.
Dial Code -> Outgoing Destination
This section describes the traffic that you send to your providers, disaggregated by destination. It has the same structure and functionality as the Dial Code -> Incoming Destination section. By default it shows data for the previous hour. Figure 25 represents the sequence of levels for the Dial Code -> Outgoing Destination.
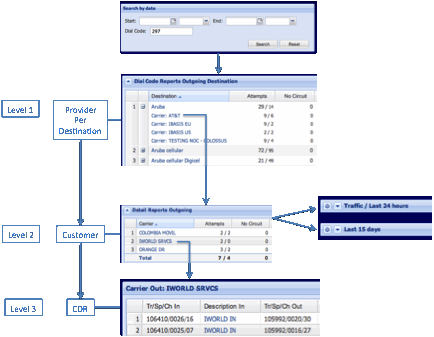
⢠Once you have narrowed your search by Dial Code and/or date you can access the first level. Here you have a list of destinations and providers that deliver the traffic there.
⢠To access level 2 click on one of the carriers and you will see a list of customers that are sending traffic to that destination.
⢠And on level 3 you have the CDR for the route.
Dial Code -> Incoming and Outgoing Country
This option shows the traffic data disaggregated per country. It has a similar structure and functionality as the Dial Code -> Incoming. By default you will see data for the previous hour.
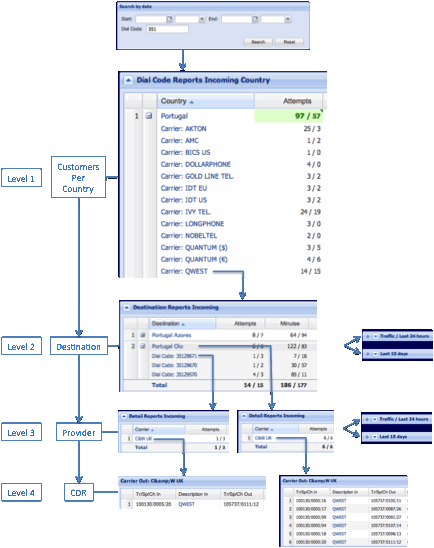
This figure represents the level of detail in the Dial Code -> Incoming Destination window for dial code 351. It starts with a general list of all the countries. Narrow the list by making use of the search window.
⢠Level 1 shows the list of customers for this dial code.
⢠In the second level you can access a list of destinations per customer. If you expand one of those destinations, you can see the list of dial codes for that destination.
⢠In the third level you have a list of providers for a specific destination or dial code.
⢠And level 4 contains the CDR of the route.
The option Dial Code -> Outgoing Destination has a similar distribution of levels.
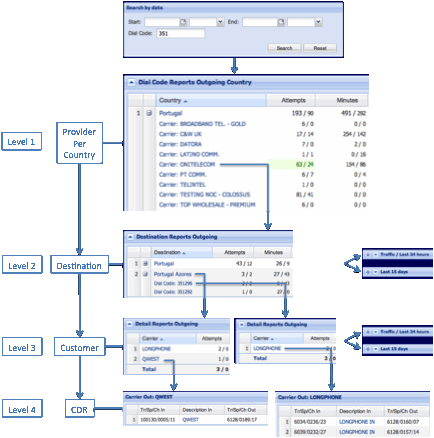
In Figure 27 you have an example of a narrowed search by dial code (351).
⢠Level 1 shows the list of providers for this dial code.
⢠In the second level you can access a list of destinations per provider. If you expand one of those destinations, you can see the list of detailed dial codes for that destination.
⢠In the third level you have a list of customers for a specific destination or dial code.
⢠And level 4 contains the CDR of the route. This functionality is very useful to locate potential problems or unusual behavior of your traffic in the previous hour (by default). The Events Color Codification of Table 1 is used to denote such cases.